Let's Encrypt 一个免费的自动化加密证书颁发机构。目前有Google等大厂互联网公司进行维护。ACME协议是IETF标准,由于IETF已将ACME协议标准化为RFC 8555。
准备工作
环境:centos7 软件 certbot git 脚本:certbot-letencrypt-wildcardcertificates-alydns-au
软件安装:
软件安装:

# 安装证书工具

yum update

yum install -y certbot git

certbot --version  # 测试是否安装成功。这里有可能会失败 下面我会说解决方案。
git --version

# 下载脚本根据阿里云活腾讯云域名管理自动生成证书。 如果不需要自动话配置证书。只是生成证书到这里已经可以结束了  直接下一步看使用说明即可

# 选择一个目录下载。个人习惯脚本放在 /var/lib/ 目录下 后面都路径为需要下载的地方和重命名下载的文件。


git clone https://github.com/ywdblog/certbot-letencrypt-wildcardcertificates-alydns-au.git /var/lib/auto-certbot
# --standalone 这里指“独立”Web服务器获取证书 这个模式
# -d 可以制定多个域名。
# --dry-run 测试命令的有效性 并不会真正生成证书。降低调试的难度。
certbot certonly --standalone -d www.example.com --dry-run
# 第一次执行会提示输入邮箱
Enter email address (used for urgent renewal and security notices) (Enter 'c' to
cancel): you@gmail.com --------> 输入你的邮箱创建账号(只有第一次使用时会出现)
(A)gree/(C)ancel: a --------> 选择 A 同意 (只有第一次使用时会出现)
# 输出一下信息代表已经成功了
Obtaining a new certificate
Performing the following challenges:
http-01 challenge for www.example.com
Cleaning up challenges
Problem binding to port 80: Could not bind to IPv4 or IPv6.
# 生成证书
certbot certonly --standalone -d www.example.com
# 输出类似的信息说明证书已经生成好了
Congratulations! Your certificate and chain have been saved at:
/etc/letsencrypt/live/www.example.com/fullchain.pem
Your key file has been saved at:
/etc/letsencrypt/live/www.example.com/privkey.pem
Your cert will expire on 2019-08-16. To obtain a new or tweaked
version of this certificate in the future, simply run certbot
again. To non-interactively renew *all* of your certificates, run
"certbot renew"
/etc/letsencrypt/live/ 路径下就是证书了
# 到这里就已经获得了90天的证书了。可以愉快的玩耍了。
自动更新证书
当然这不是我们的终极目标因为还有很多东西还没做。比如这个证书的时间比较短。还有就是每个域名都要生成一次这是多么的坑爹。当然通配符的证书是肯定要搞的。接下来就使用我们刚刚所说的那个脚本来同时解决上面的两个问题。
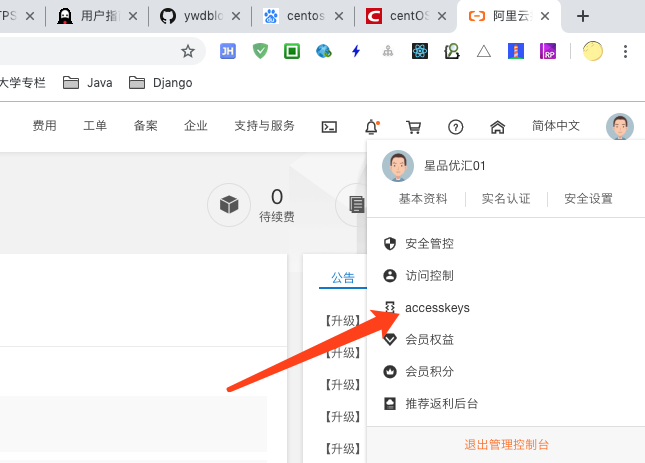
首先要准备两件事 登录阿里云 创建Access Key 然后执行下面的命令。这里使用通配方式创建证书的方式必须进行dns txt的方式来进行。 这里的脚本大家也可以有兴趣翻看。这里就不再解释其中的原理了。

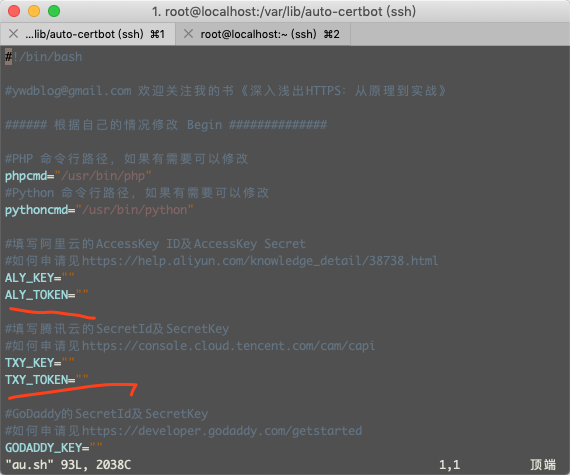
cd /var/lib/auto-certbot
vim au.sh  填写完毕并保存。


 certbot certonly  -d *.nehza.com --manual --preferred-challenges dns --dry-run  --manual-auth-hook "/var/lib/auto-certbot/au.sh python aly add" --manual-cleanup-hook "/var/lib/auto-certbot/au.sh python aly clean"

# 输出一下信息代表已经成功
IMPORTANT NOTES:
 - The dry run was successful.


# 去掉 --dry-run 开始生成证书
 certbot certonly  -d *.nehza.com --manual --preferred-challenges dns   --manual-auth-hook "/var/lib/auto-certbot/au.sh python aly add" --manual-cleanup-hook "/var/lib/auto-certbot/au.sh python aly clean"


#添加定时任务
crontab -e
30 6 */1 * *  sh  /var/lib/auto-certbot/auto.sh

#保存推出
# 定时执行的脚本
certbot renew --manual --preferred-challenges dns --manual-auth-hook "/var/lib/auto-certbot/au.sh python aly clean" --manual-cleanup-hook "/var/lib/auto-certbot/au.sh python aly clean"
/usr/local/nginx/sbin/nginx -s reload
# /usr/local/apache/bin/apacheclt restart
到这里已经告一段落了。到了这里在写这边博客之前已经运行了差不多进一年多了。都没有出现问题。还是相对来说比较稳定的。
当然如果服务器非本地的话那就另说了。 比如我们公司的域名比较多。写这种脚本比较难管理复用行又不高。我们是在搭配着公司的一些服务来做可能更方便。这里可能比较复杂。比如你生成的证书可能不在一台服务器上。活着多台服务器上都需要。这个时候可能配合者jerkins 来使用会更好管理一些。后面为会写一片便于Jenkins的文章来具体说明他都是又那些用处。
错误解决:centos 安装certbot 报错解决 默认安装的request版本是错误的

```bash
pip install --upgrade --force-reinstall 'requests==2.6.0'
```